Initial Step by Step Wiring and Testing of a C94 with UCCNC
Posted:
December 24, 2020
The main objectives of these step-by-step instructions are:
- Power the Board and e-stop and test that the board activates/deactivates at hardware level only with e-stop.
- Install the UCCNC license and configure the pinout and functions of UCCNC supported by the C94 and test that UCCNC is communicating with the C94 OK.
- Enable and configure the Safety Charge Pump to make sure the C94 activates (green LED) when UCCNC becomes active (out of reset).
Software: UCCNC V 1.2115
https://www.cncdrive.com/UCCNC/setup_1.2115.exe
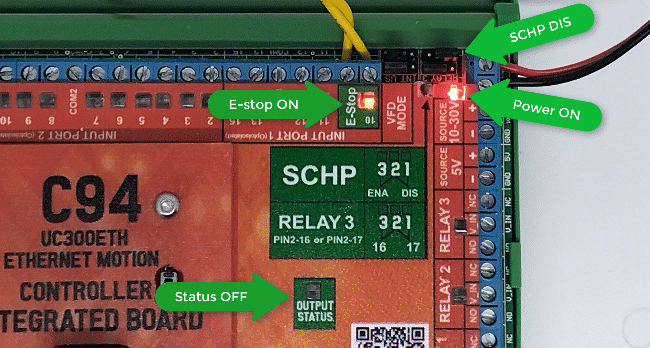
STEP 1: Connect an E-Stop button to short the E-Stop terminals.
- This should give you a green LED while the board is powered and the e-stop is closed.
- IF not, check other possible fault conditions and make sure they are not active.
STEP 2: Make sure the controller is connected to an Ethernet port on the PC and powered with LEDs ON.

STEP 3: The UCCNC license must be installed to establish the connection with the hardware. Replace the demo license that comes with the UCCNC installation with the license that you purchased.
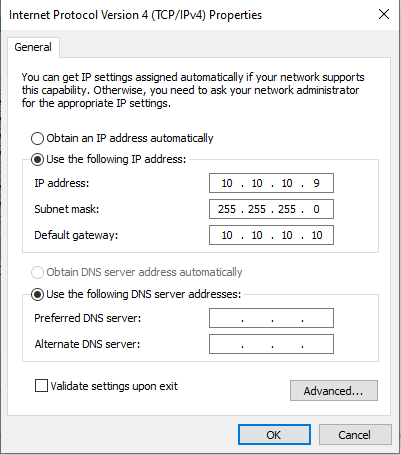
STEP 4: Download and run the UC Utilityxxx program to establish the connection, set a fixed IP on the PC’s LAN card, and whitelist the device on the network. You may need to manually configure the LAN’s IPv4 protocol to use a fixed IP.

STEP 5: Configure UCCNC manually using these instructions:
https://www.cnc4pc.com/blog/post/UCCNC-with_UC300ETH_basic_configuration_for_c76_or_c94
You can also download and install the cnc4pc.com software to configure UCCNC. This software will configure all the pinouts and functions supported by the C94.

- Select the profile of your preference> click on install.

- Finally, click on Close.
STEP 6: Start UCCNC and it should show that it is licensed and should talk ok to the UC300ETH installed in the C94.

STEP 7: Final Test
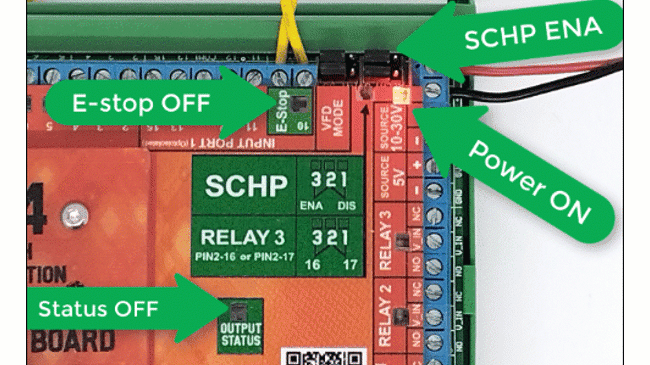
- Test the E-Stop by opening the circuit a confirming the green LED goes off.
- You can now enable back on the SCHP by moving (JUMPER=ON) so it will be the control software that will enable the system.
Related Products
0 Comment(s)